Emergency medicine ultrasound Guide
Basics & Set Up
PROBES
Words
- More Words
- More Words
- Even More Words
GAIN
Words
- More Words
- More Words
- Even More Words
M MOde
Words
- More Words
- More Words
- Even More Words
Doppler
Words
- More Words
- More Words
- Even More Words
KNOBOLOGY

Master of Curly Hair
ARTIFACTS
POCUS
CARDIAC
|
Tamponade
|
EFAST
|
PROBE: Phased Array or Curvilinear MODE: FAST STARTING DEPTH: 8 cm |
SCANNING:
|
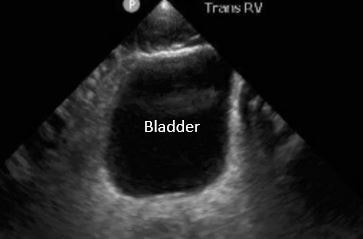
VIEWS:
☐ Morisson's Pouch
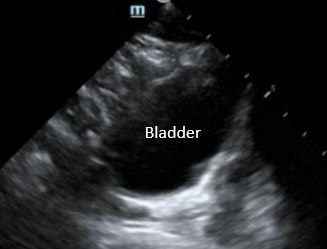
☐ Retrovesicular space
☐ Sagittal
☐ Transverse
☐ Parasplenic
☐ Subcostal Cardiac
☐ Lung sliding
☐ Morisson's Pouch
☐ Retrovesicular space
☐ Sagittal
☐ Transverse
☐ Parasplenic
☐ Subcostal Cardiac
☐ Lung sliding
|
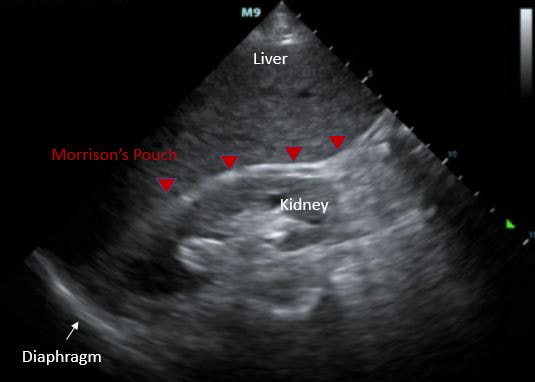
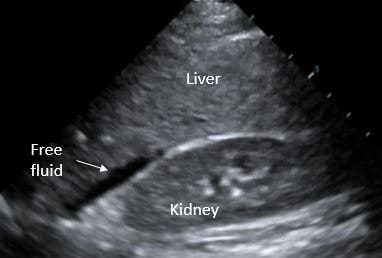
Morrison's Pouch, interface between liver and kidney
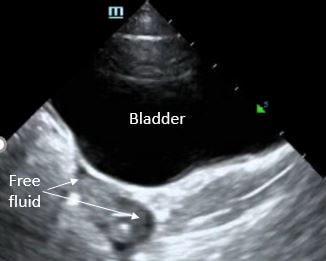
Retrovesicular sagittal view
Subcostal view
|
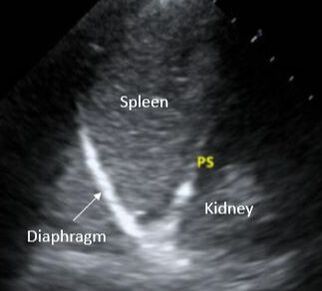
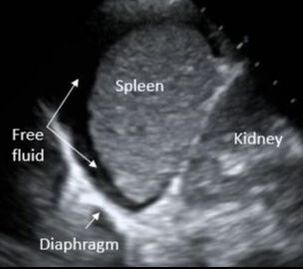
Parasplenic view, located between spleen and diaphragm
Retrovesicular transverse view
Lung Sliding
|
|
Morrison's Pouch, free fluid
Retrovesicular view sagittal, free fluid

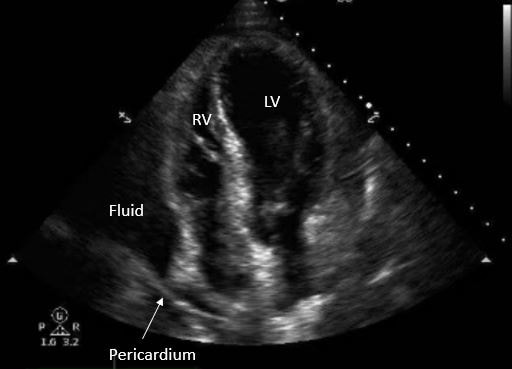
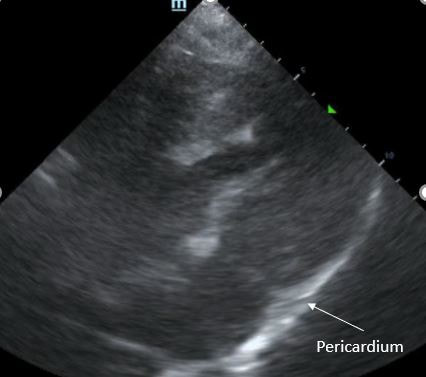
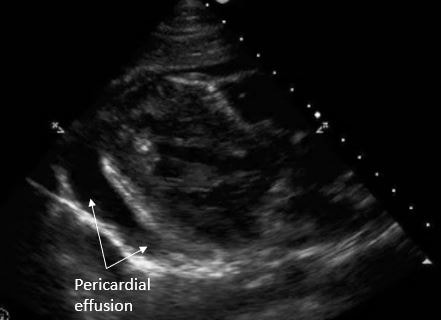
Pericardial Effusion
|
Parasplenic view, free fluid
Retrovesicular view transverse, free fluid
|
- Incomplete view of Morrison's pouch
- Scan all the wall to the caudal tip of the liver/inferior pole of the kidney
- Missed free fluid posterior to the bladder
- Due to posterior acoustic enhancement, fluid behind the bladder may appear isoechoic. Adjust the TGC to remedy this artifact.
- Difficulty obtaining parasplenic view
- Adjust probe to get a more posterior view of the LUQ
OB
|
PROBE: <6 weeks = Enodcavitary >6 weeks = Curvilinear MODE: EARLY OB STARTING DEPTH: 16 cm |
SCANNING :
|
|
VIEWS:
☐ Uterus in transverse and sagittal planes ☐ IUP within uterus - GS + yolk sac OR fetal pole in the fundus ☐ Adnexa ☐ Cul-de-sac |
MEASUREMENTS:
☐ Fetal HR (M-Mode) ☐ Gestational age (choose one method) - Gestational sac - CRL (head to bottom) - BPD (outer to inner, perpendicular to falx) - Femur length ☐ Fetal demise - fetal pole > 7mm without HR, OR - GS >25 mm without fetal pole |
|
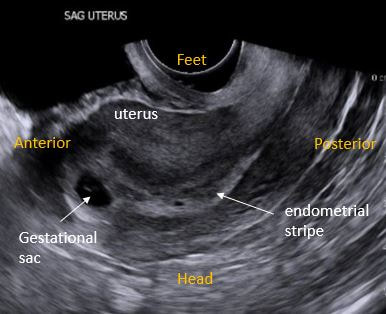
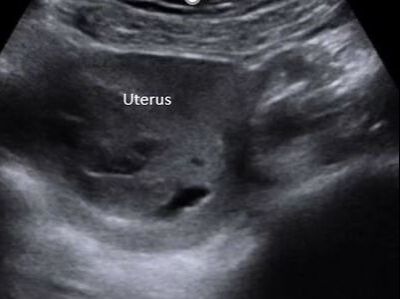
Sagittal uterus with endocavitary probe
|
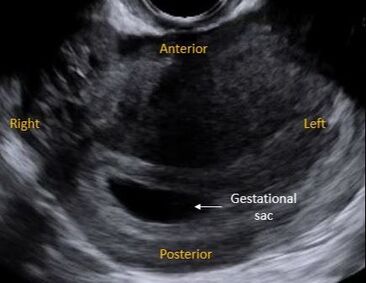
Transverse uterus with endocavitary probe
|
|
|
|
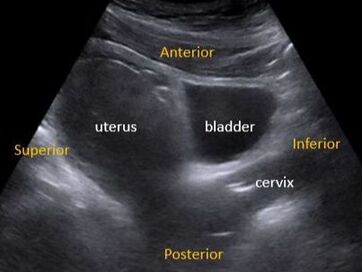
Sagittal uterus with transabdominal probe
|
Transverse uterus with transabdominal probe

|
|
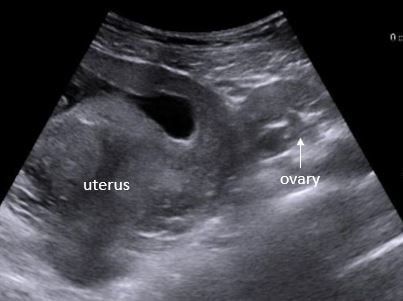
Transverse view of the adnexa
|
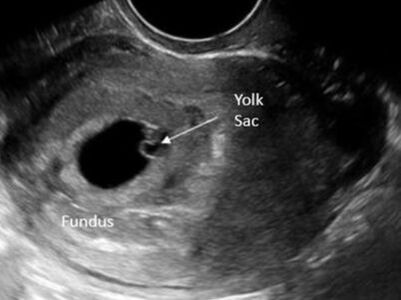
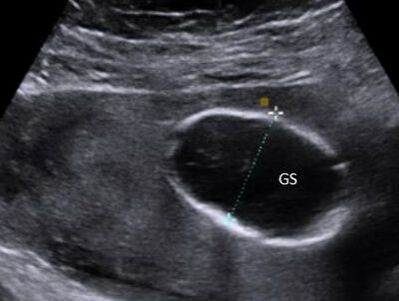
IUP, yolk sac within gestational sac in fundus
|
|
Ruptured ectopic pregnancy
|
Intrauterine demise, no fetal pole seen in GS
|
|
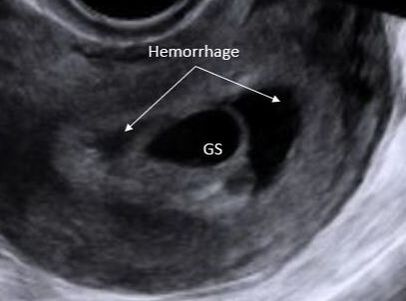
Subchorionic hemorrhage
|
Molar pregnancy
|
|
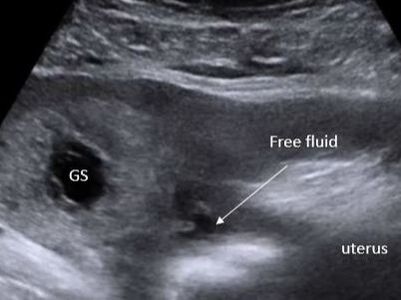
Free fluid in the cul-de-sac

|
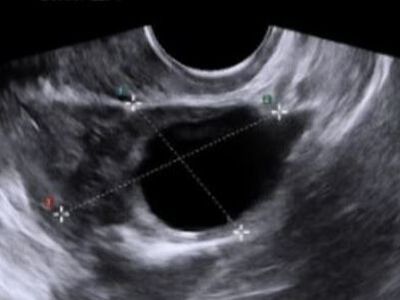
Ovarian Cyst
|
Pitfall |
Solution |
Not able to identify the gestational sac with curvilinear probe |
Switch to the endocavitary probe |
Difficulty identifying ovaries |
Look lateral to the uterus; ovaries typically have a "chocolate chip appearance" |
Mistaking ectopic for IUP |
IUP = fetal pole/yolk sac within GS in fundus |
Missing a heterotopic pregnancy |
Even if an IUP is identified, be sure to examine the adnexa |
Failing to perform a bedside US because bHCG is below the "discriminatory zone" |
A beside US should be performed if indicated, regardless of the quantitative bHCG |
LuNG
|
PROBE: Linear or Curvilinear MODE: Thoracic/Lung STARTING DEPTH: 6 cm |
SCANNING:
|
VIEWS (right and left):
☐ Lung sliding
☐ Anterior chest
☐ Mid-Axillary line
☐ Costophrenic angle
☐ Lung sliding
☐ Anterior chest
☐ Mid-Axillary line
☐ Costophrenic angle
|
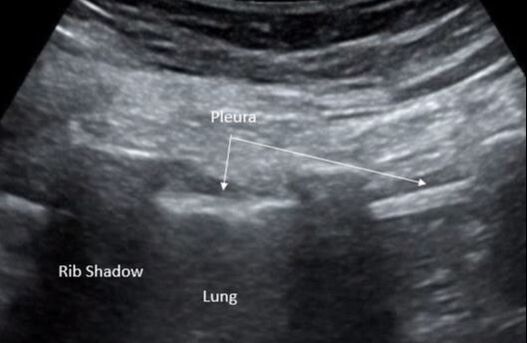
Normal Lung Anatomy
|
Video clip of normal Lung Sliding
|
|
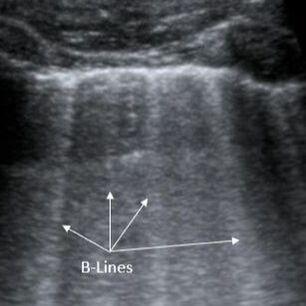
B-Lines
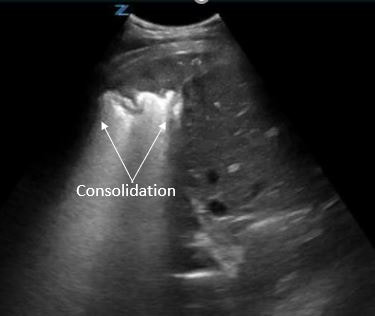
Consolidation
|
Pleural Effusion
Video clip of pneumothorax with lung point
|
- Absence of lung sliding mistaken for pneumothorax
- Absent lung sliding can also be seen in: right maintem intubated patients, patients with bullous disease, severe consolidation
- Missed pneumothorax
- Pneumothorax will only be seen in the scanned area. Likelihood of identifying pneumothorax is highest when the anterior and apical areas of the chest are scanned.
- Mirror artifact mistaken for lung consolidation
- A mirror artifact duplicate an image by reflection. Confirm that that what appears to be a consolidation is not actually a reflection of the liver or spleen.
- Intra-abdominal fluid mistaken for pleural fluid
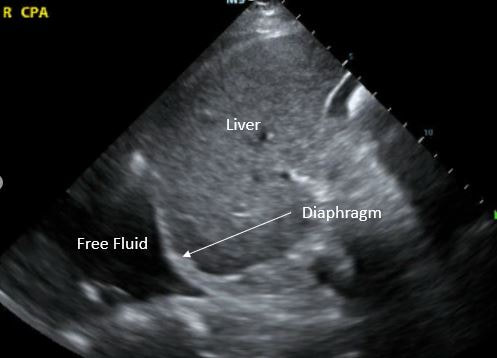
- Identify the location of fluid in relation to the diaphragm (above or below) to correctly identify intrabdominal vs intrathoracic fluid.
- Identify the location of fluid in relation to the diaphragm (above or below) to correctly identify intrabdominal vs intrathoracic fluid.
RENAL
|
|
SOFT TISSUE
|
|
Biliary
|
|
DVT
THORACIC
AORTA
Pediatric POCUS
Appendix
|
PROBE: Linear or Curvilinear MODE: Abdomen or Peds Abdomen STARTING DEPTH: 4 cm |
SCANNING:
|
|
VIEWS
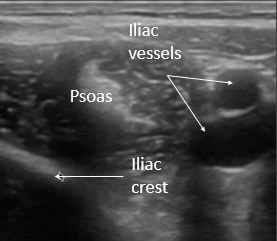
☐Psoas Muscle ☐Iliac Vessels Appendix ☐Long axis with blind sac connected to cec ☐Short axis with target sign |
Measurements:
Diameter < 6mm Wall thickness < 3mm |
|
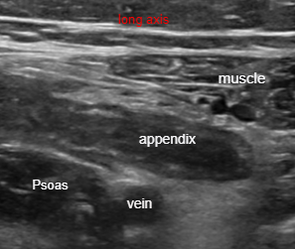
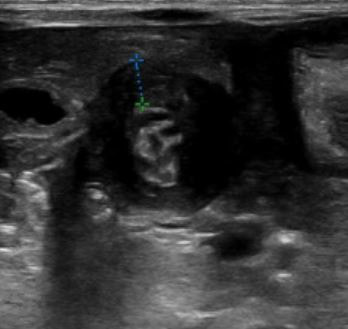
Appendix in long axis
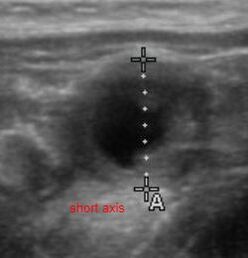
Appendix in short axis
|
Appendix in long axis
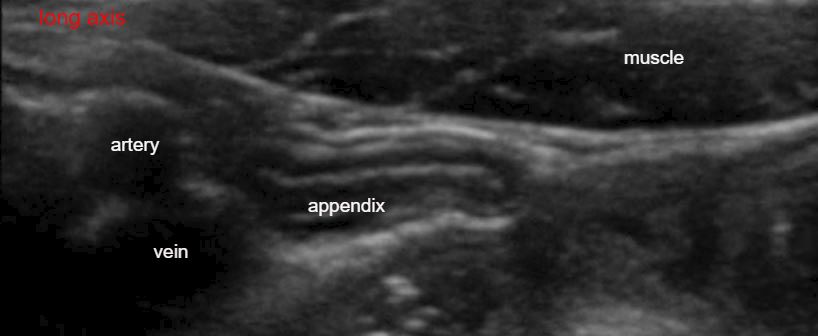
The appendix is a blind-ended tubular structure located in the RLQ. A normal appendix is concentrically layered, mobile, and compressible. Location of the tip of the appendix is variable, the most common being pelvic and retrocecal.
|
|
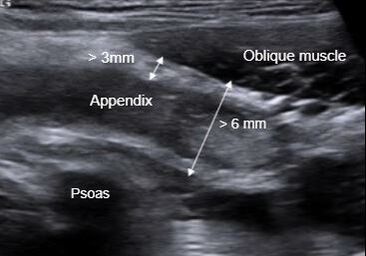
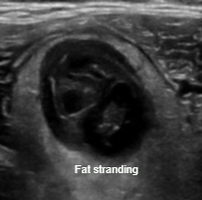
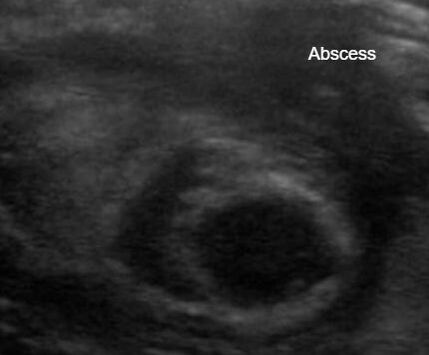
Appendicitis

|
Diagnostic Criteria
Diameter > 6 mm or Wall thickness > 3mm + Signs of inflammation Non-compressible Aperistaltic Fat stranding Fecalith Free Fluid 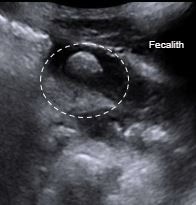
|
Pitfalls of Appendix US
- Appendix obscured by bowel gas
- Move bowel gas using graded compression
- Thickened ileum is mistaken for appendix
- Identify blind ended pouch and trace to cecum
- Distal tip appendicitis is overlooked
- Visualize entire length of appendix
- False Positive interpretation
- A normal appendix can be > 6mm
- For positive finding, there must be an enlarged appendix + signs of inflammation
- False Negative interpretation
- A normal appendix must be visualized for a negative study
Pylorus
|
PROBE: LINEAR MODE: PEDS ABDOMEN DEPTH: 4 cm |
SCAN:
1. Place patient in comfortable position 3. Place probe in the epigastrium with marker facing patient's right 4. Use the liver and gallbladder as an acoustic window to visualize the pylorus in its long axis 5. Turn the probe marker towards the patient's head to visualize the pylorus in short axis |
|
VIEWS:
☐ Pylorus in short axis ☐ Pylorus in long axis |
MEASUREMENTS:
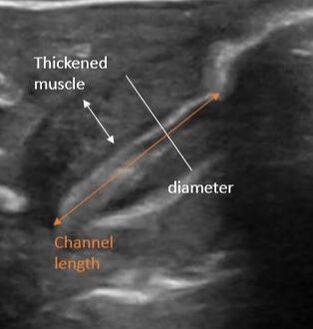
☐ Channel length < 15mmm ☐ Muscle wall < 3mm |
|
Pylorus short axis
|
Pylorus Transverse
|
|
Pyloric Stenosis in Long Axis
|
Pyloric Stenosis in Short Axis
|
- Unable to identify pylorus
- Increase depth to identify landmarks (liver, gallbladder, stomach). Once stomach is identified, decrease depth, and follow stomach antrum to pylorus
- Measurements are incorrect
- Measure only the hypoechoic muscle layer on one side of the channel
- Pylorospasm
- Transient muscle spasm that can appear like pyloric stenosis. Resolves with feeding.
Intussusception
|
PROBE: LINEAR MODE: PEDS ABDOMEN DEPTH: 6 cm 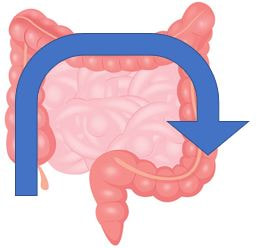
|
SCAN:
1. Place patient in comfortable position and use warm gel to help patient tolerate US 2. Start with the probe marker to the patient's right in the RLQ and scan up to the RUQ. 3. Turn the probe with the marker to the patient's head and scan across the transverse colon. 4. Turn the probe marker back to the patient's right and scan down from LUQ to the LLQ. |
|
VIEWS:
☐ Short axis with target sign ☐ Long axis |
MEASUREMENTS:
☐ Short axis target > 2 cm is positive for intussusception |
|
RLQ normal anatomy, start scan by identifying these landmarks
|
Colon, scalloped, dirty shadowing, poor penetrance
Small bowel, multiple loops seen with peristalsis 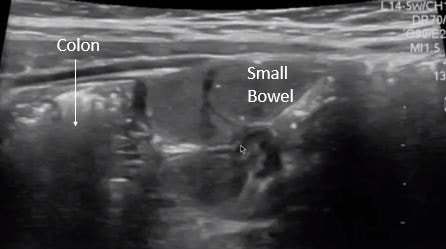
|
|
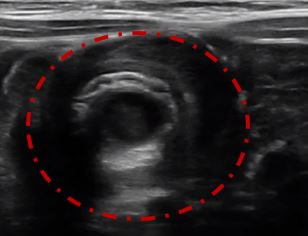
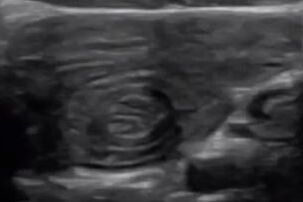
Ileo-colic Intussusception in short axis with target sign
Ileo-Ilial intussusception, distinguished by size < 2cm and presence of peristalsis
|
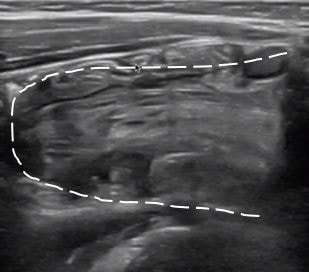
Ileo-colic Intussusception in long axis with "sandwich sign"
|
- Intussusception mistaken for a lymph node or kidney.
- Intussusception can be distinguished from lymph node by size and presence of concentric circles (loops of bowel).
- Intussusception can have the appearance of the kidney in long axis. Identify the kidneys separately to distinguish from intussusception.
CRANIAL
EMGuideWire |
|
LEGAL DISCLAIMER (to make sure that we are all clear about this):The information on this website and podcasts are the opinions of the authors solely.
For Health Care Practitioners: This website and its associated products are provided only for medical education purposes. Although the editors have made every effort to provide the most up-to-date evidence-based medical information, this writing should not necessarily be considered the standard of care and may not reflect individual practices in other geographic locations.
For the Public: This website and its associated products are not intended to be a substitute for professional medical advice, diagnosis, or treatment. Your physician or other qualified health care provider should be contacted with any questions you may have regarding a medical condition. Do not disregard professional medical advice or delay seeking it based on information from this writing. Relying on information provided in this website and podcast is done at your own risk. In the event of a medical emergency, contact your physician or call 9-1-1 immediately.